
In this article
Resin printers turn liquid plastic into solid parts using light, and the detail is incredible: miniatures with readable faces, jewelry, tiny mechanical parts. But resin is a chemical, not just a plastic, and it comes with more rules than filament. This guide explains every common resin type in plain English, what your printer and workspace need, and how to handle resin safely.
The quick answer
- New to resin? Start with an ABS-like or standard resin. They’re forgiving, cheap and great for miniatures.
- Printing tiny details like tabletop minis? Look for high-detail resins made for 8K+ printers.
- Parts that have to bend or take a hit? Use a tough or flexible resin, or print it in filament instead.
- Whatever you pick: nitrile gloves, safety glasses and ventilation are not optional with resin.
Resin or filament?
Filament printers melt plastic and draw each layer with a nozzle. Resin printers shine UV light through a screen to harden a whole layer of liquid resin at once. That means resin prints are far smoother and more detailed, but they’re smaller, more brittle on average, and messier to finish: every print has to be washed and cured under UV light before it’s done. Resin is the better choice for miniatures, figures, jewelry and small detailed parts. Filament is better for big parts, functional parts, and anyone who doesn’t want to deal with chemicals. (New to filament? See every 3D printing filament explained.)
Every resin at a glance
Exposure times and settings depend on your exact printer and resin, so always start from the manufacturer’s recommended profile and run a calibration test print.
| Resin | Difficulty | Wash in | Feel when cured | Best for |
|---|---|---|---|---|
| Standard | Easy | Isopropyl alcohol (IPA) | Hard, fairly brittle | Display models, figures, prototypes |
| ABS-like | Easy | IPA | Hard, less brittle | Miniatures and figures that get handled |
| High-detail (8K and up) | Easy–Medium | IPA | Hard | Tabletop minis, fine detail |
| Water-washable | Easy | Water | Hard, can be more brittle | Printing without IPA |
| Plant-based / “eco” | Easy | IPA or water (check label) | Hard | Lower odor; still hazardous |
| Tough / engineering | Medium | IPA | Strong, slightly flexible | Snap fits, clips, functional parts |
| Flexible / elastic | Medium–Hard | IPA | Rubbery | Grips, seals, soft parts |
| High-temp | Medium | IPA | Hard, heat-resistant | Molds, parts near heat |
| Clear | Medium | IPA | Hard, see-through after finishing | Lenses, light pipes, display pieces |
| Castable | Hard | IPA | Wax-like | Jewelry for metal casting |
The resin types, explained
Standard and ABS-like
Standard resin is the basic, affordable option. It captures detail well but snaps easily, so thin parts like swords and spears on miniatures break. ABS-like resin is the everyday favorite: it prints just as easily but is noticeably less brittle. Despite the name, it isn’t ABS plastic; it’s simply tougher resin.
High-detail resins
Made for high-resolution 8K, 12K and 16K printers, these resins are tuned to hold the tiniest features, like eyes on a 28 mm miniature or textures on armor. They often come in grey, which makes detail easier to see and paint over.
Water-washable
Water-washable resin cleans off in plain water instead of isopropyl alcohol, which is cheaper and less smelly. Two important catches. First, the cured parts can be more brittle and can crack over time if they’re left in water too long or not dried properly. Second, the wash water is contaminated with resin and must never go down the drain. It needs the same careful disposal as dirty alcohol (see Handling resin safely).
Plant-based and “low-odor”
These resins smell less and use some plant-derived ingredients, which makes them more pleasant to work with. But low odor doesn’t mean non-toxic. They still contain the same kinds of chemicals that can irritate skin and cause allergies, and they need the same gloves, ventilation and disposal as any other resin.
Tough, flexible and high-temp
Tough resins bend a little before breaking, so they’re good for clips, snap fits and parts that get used. Flexible resins cure rubbery and are trickier to print, since they need more supports and careful settings. High-temp resins survive heat that would soften normal resin, which makes them useful for molds. Many people mix a little tough or flexible resin into standard resin to make it less brittle; if you try this, stick to resins from the same brand and test first.
Clear resin
Clear resin prints look cloudy at first. To get them truly see-through, you sand them smooth and add a clear coat, or dip them in resin and cure again. Clear resin also tends to yellow if it’s over-cured, so use short cure times.
Castable and dental resins
Castable resin burns away cleanly in a kiln, so jewelers print a ring in resin, pack it in plaster, and pour metal into the space it leaves behind. Dental and “biocompatible” resins are only certified when used in a validated professional process with specific printers, wash and cure equipment. Don’t print mouthguards, aligners or anything that goes in your mouth or on your skin at home.
From print to finished part
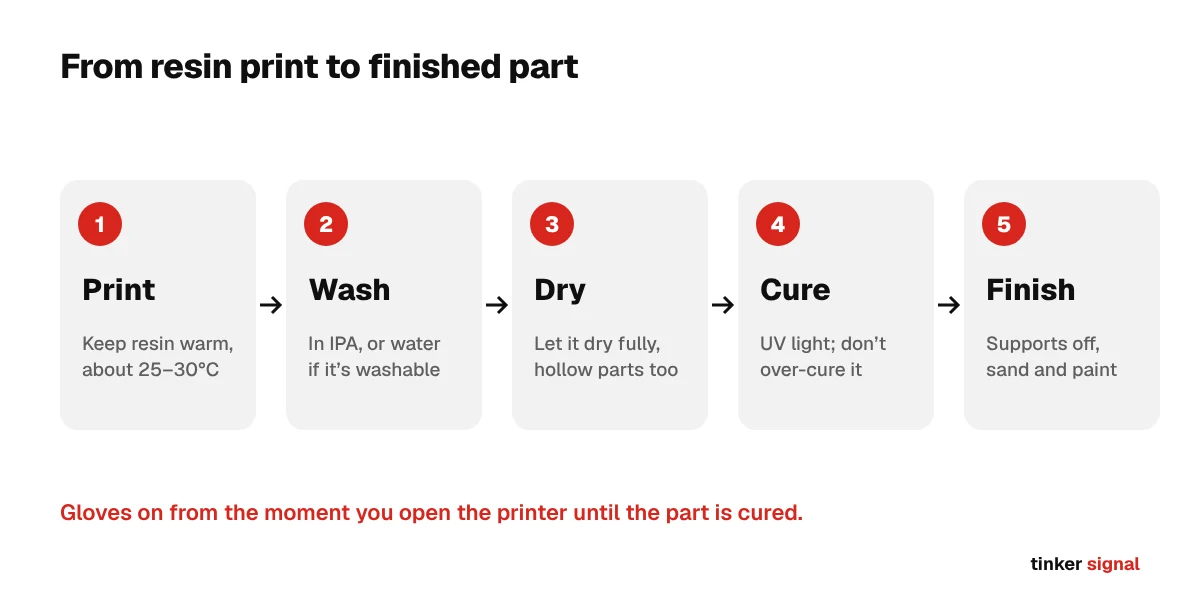
- Print. Keep the room and resin warm, ideally around 25–30°C (77–86°F). Cold resin is the most common cause of failed prints. Some printers have a heated vat for this.
- Wash. Gloves on. Rinse the print in IPA (or water, for water-washable resin) to remove the sticky uncured resin. A wash station with two containers, one for a dirty first wash and one for a clean second wash, works best.
- Dry. Let it dry completely before curing, especially hollow prints and water-washed prints.
- Cure. Harden it under UV light, in a cure station or sunlight. Follow the resin’s recommended time; over-curing makes parts brittle and yellow.
- Finish. Snip off supports (easier before curing for many resins), then sand, prime and paint.
Tip: If you hollow out a print to save resin, always add drain holes near the bottom. Liquid resin trapped inside a hollow print can build pressure and crack it open, sometimes weeks later.
Handling resin safely
Resin printing is safe when you treat it like the chemical hobby it is. The biggest risks come from liquid, uncured resin, not from finished, fully cured prints.
A note on the science: Skin irritation and allergic reactions from liquid resin are well documented; that’s why gloves are non-negotiable. The long-term effects of breathing resin fumes at home are still being studied, so treat the ventilation advice as sensible precautions. Always read the safety data sheet (SDS) for your resin, and talk to a doctor if you develop a rash or have asthma or other breathing concerns. This guide isn’t medical advice.
Protect your skin and eyes
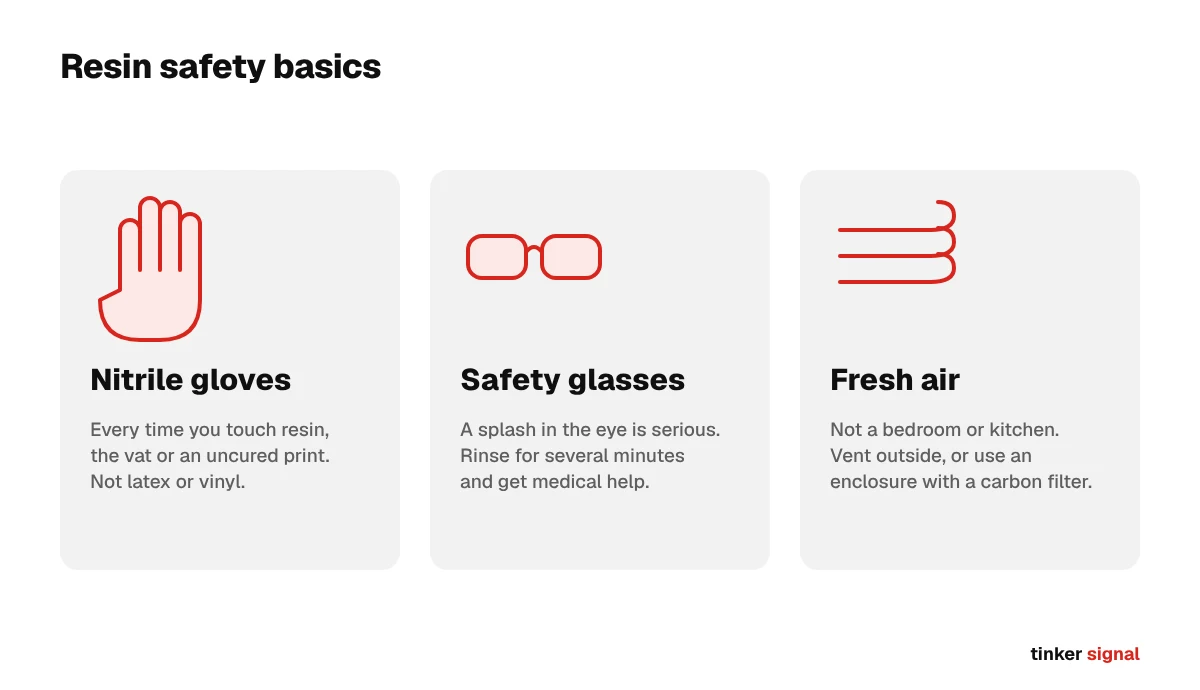
- Always wear nitrile gloves when touching resin, the vat, the build plate or uncured prints. Latex and vinyl gloves don’t protect well against resin. Replace gloves if they tear or get covered.
- Why it matters: resin can cause a skin allergy (sensitization). It often starts with no reaction at all, then after repeated contact your skin can start reacting every time, and that allergy can be permanent.
- If resin gets on your skin, wash it off right away with soap and cool water. Don’t use alcohol on your skin; it can help resin soak in.
- Wear safety glasses. A splash in the eye is serious. Rinse with water for several minutes and get medical help.
Ventilation and where to print
- Resin and IPA both give off fumes. Print in a well-ventilated room, not a bedroom or kitchen, and ideally vent the printer outside or use an enclosure with a carbon filter.
- Keep resin, prints and tools away from food, food-prep areas, kids and pets.
Isopropyl alcohol
IPA is highly flammable, and its fumes can build up in small rooms. Keep containers closed when you’re not using them, keep them away from flames, heaters and cure lamps that get hot, and ventilate while washing.
Disposal: never down the drain
Never pour liquid resin, dirty IPA or water-washable rinse water down a sink, toilet or drain. Uncured resin is harmful to aquatic life and can damage plumbing.
- Dirty IPA or wash water: leave it in a clear container in sunlight or under a UV lamp. The resin in it hardens and settles to the bottom. You can then filter and reuse the IPA, and throw away the hardened sludge as solid waste.
- Leftover resin, failed prints, paper towels and gloves: cure them in sunlight or under UV until fully hard, then throw them away with regular trash. Check your local rules; some areas treat it as household hazardous waste.
- Old resin bottles: let the last bit cure inside the open bottle before throwing it away.
Finished prints
- A fully washed and cured print is much safer to handle, but resin prints are not food-safe. Don’t use them for anything you eat or drink from.
- Sanding cured resin makes fine dust. Wear a mask, or sand wet to keep the dust down.
- If a print still feels sticky after curing, it isn’t finished. Wash and cure it again before handling it without gloves.
Storing resin
Keep bottles tightly closed, out of sunlight, at room temperature, and out of reach of kids and pets. Shake bottles well before pouring, because pigments settle. Resin left in the vat should be covered from light, and filtered back into its bottle if it will sit for more than a few days.
The bottom line
For most people, an ABS-like resin in grey is the perfect starting point, especially for miniatures. Add a tough resin when parts need to survive handling, and look at water-washable if you’d rather skip IPA, as long as you remember the rinse water still needs proper disposal. Whatever you print, the habits matter more than the resin: gloves, glasses, ventilation, and never down the drain.